Do you ever put off a small task for so long that by the time you actually complete it such a big weight is lifted off your shoulders and your feeling of productivity is disproportionate to the rather small size of the job itself? No, just me? Okay. I can accept that.
Example: We have a very small dual fish bowl with a divider for our 2 betta fish. I HATE cleaning it. It takes all of 5 minutes, but I still don’t like doing it. So when I intend to clean it out, I move it to the counter by the sink. And there it sits. Just staring at me every time I go to the sink. Taunting me. And still I let it sit for a week or more before I finally clean it out. Then, I feel an immense amount of accomplishment and as if I don’t need to do anything else that day. That 5 minutes of cleaning really took a huge weight off my shoulders. I’ve done so much today! Cereal for dinner, everyone!
When I was a girl, my mother taught me how to cross-stitch. (She taught me many other crafty things as well.) I really enjoyed completing little embroidered pictures until the day I picked one that was way too tedious for my child-level of patience! I’m pretty sure she warned me that it would take too long, but I wanted it anyway. It was a picture of a little girl in a pink dress holding a pot of roses. And she had dark, curly hair. So much dark curly hair! And that’s where I started. After weeks of working with just brown tones and feeling no sense of nearing any kind of completion, I gave up. I put the piece aside and again, it taunted me every time I looked at it. It was a reminder that I had quit, I failed, I shouldn’t have picked it, my mother had wasted her money on it for me, and I couldn’t move on to a new project or I REALLY would have quit. It sat there all four years of high school. Then, when I was packing up to start my freshman year of college, I secretly packed it in my car. I was an adult now, gaining my independence. I wasn’t going to let this uncompleted task hang over me. I finished the piece that year and paid to have it custom framed and presented it to my mother for Mother’s Day, or her birthday, or a combination of the two! 😉 It now hangs on the wall in my parents’ bedroom and I’m pretty sure she changed the entire color scheme of the room to coordinate with the picture.
I love the feeling of accomplishing something–no matter how big or small! Don’t we all? I can’t stand to see a task truly go uncompleted and since the cross-stitch project, I can’t recall a single project I haven’t completed. Although, I also haven’t picked up any new cross-stitch since! Ha!
 Last week I got to experience another sense of accomplishment when I completed Elijah’s baby blanket! He’s almost 6 months now and I started at the beginning of my pregnancy, but at least it didn’t take 4 years! It’s actually not the longest it’s taken me to do one of my children’s blankets, either. Noah was about 9 months when I finally finished his. Abby was 3 months. Emmalyn is the only one whose blanket was actually finished before she was born. And in the process of completing my own children’s blankets, I made 6 others for friends’ babies! We don’t plan to have any more children ourselves so in a way, I feel like this chapter in my life is closing, though I can’t say that I’ll never make another baby blanket or crochet anything ever again. And I still enjoy the process, thankfully! Or maybe I’ll pick up a new hobby soon…


Either way, I’m glad to have this particular blanket done because it was a brand new pattern for me and quite a challenge. “Why did you decide to pick something new to you for your FOURTH baby when you have way less time on your hands?!” my husband asked. “Because I like a challenge.” And even more, I LOVE completing a challenge–even if that challenge is 2 bettas staring at me from the countertop for over a week. 😉
 Thanksgiving is the food holiday. We all know this. It is the quintessential day for cooking, baking, and eating all sorts of autumn foods. It is the ideal holiday for me to host because I LOVE to cook and bake and I love fall. The problem is, I don’t have a house big enough to host my whole family… yet. But my husband and I have always said that when we buy our next house, it will be big enough to host Thanksgiving. That’s one of our essential criteria. I did host one year when we had a “fluke” year and the whole family couldn’t be together. I loved it. People came and went and we got to see lots of friends and family for different parts of the meal. It was fabulous. But I still long to host my entire family for a beautiful Thanksgiving feast.
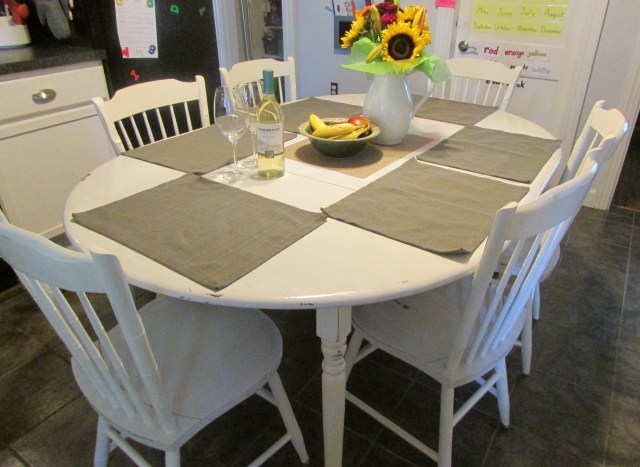
 My collection of DIY finishing or refinishing projects include a bookshelf, a toy box, kitchen cabinets, bathroom cabinets, and a couple dressers. This table and chair set was definitely the most difficult and I don’t know if was all the spindles in the chairs, or the fact that I was 8 months pregnant. But it was probably a combination of both. 😉
 THE “HOW”: Did I really want to take the time and effort to try to fully strip the table and chairs? Nope! Never mind the fact that being pregnant meant being careful of chemicals and fumes, but chalk paint is the new trend in the paint world and I’m a sucker for trying new trends! (Check out one of my
 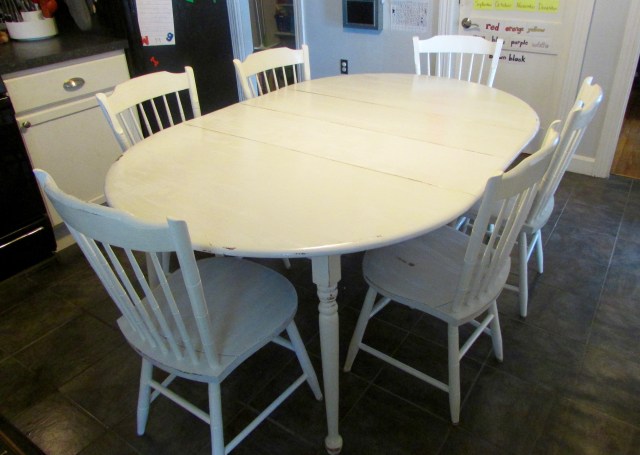 HOW IT WENT: I started with white and painted the table legs and the chair legs and spindles first. Right away, I could tell that the coverage was pretty good and I’d only need two coats. 🙂