About a month ago I decided to take on a “little” project (I use that term loosely) of refinishing my kitchen table and chairs. What better time to do that than when you’re 8 months pregnant and about to start another school year as a homeschool mom? I had honestly been meaning to do it all summer but couldn’t seem to get around to it until the end of August. It definitely stunk that it was our first week of school and we didn’t have use of our kitchen table, but it was the first week in a long time that no rain was in the forecast, so you do what you have to do! Here are some notes from my journey and some things I learned along the way…
 My collection of DIY finishing or refinishing projects include a bookshelf, a toy box, kitchen cabinets, bathroom cabinets, and a couple dressers. This table and chair set was definitely the most difficult and I don’t know if was all the spindles in the chairs, or the fact that I was 8 months pregnant. But it was probably a combination of both. 😉
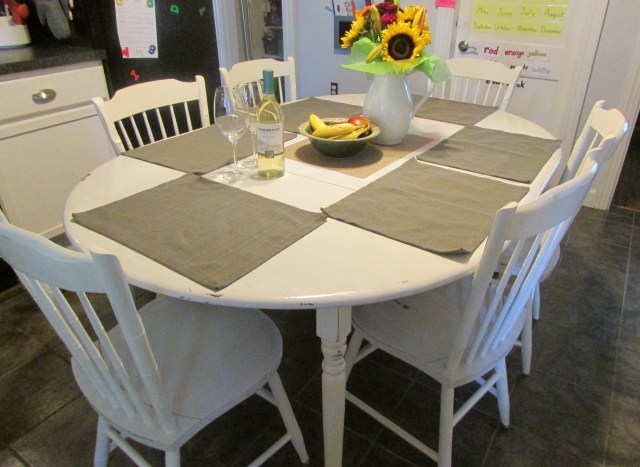
THE PLAN: I wanted to create a “farmhouse” looking table–something leaning on the white and distressed side, but since we bought this house 3 years ago and I wanted to refinish our table all along, I couldn’t quite picture it perfectly in my mind. Then, as if out of the blue (or thanks to pregnancy brain or hormones or something) it came to me: I wanted a light gray table with white legs. And I wanted it distressed. And I also didn’t want to spend too much money on paint or supplies. So that was the plan.
 THE “HOW”: Did I really want to take the time and effort to try to fully strip the table and chairs? Nope! Never mind the fact that being pregnant meant being careful of chemicals and fumes, but chalk paint is the new trend in the paint world and I’m a sucker for trying new trends! (Check out one of my summertime posts about trying a new coffee trend!) Chalk paint is used on pieces to create a “chalky” appearance, can be distressed pretty easily, and best of all can go right over any finish without needing to strip the piece down first! And here’s an even more fun product: chalk paint powder! (Something a friend pointed out to me!) This is a powder mix that you can add to any paint to turn it into chalk paint. Bingo. Found my winner and my “how.” Now I could use the light gray and white paint I had in the basement and save a little $! The popular brand of chalk paint powder can be found on Amazon (hello, 2 day shipping!), but I also found a slightly cheaper brand (do I sound like a cheap-skate yet? I do love a bargain!), so I went with that instead. Did it make a difference? I guess I won’t know until or if I try the popular brand someday!
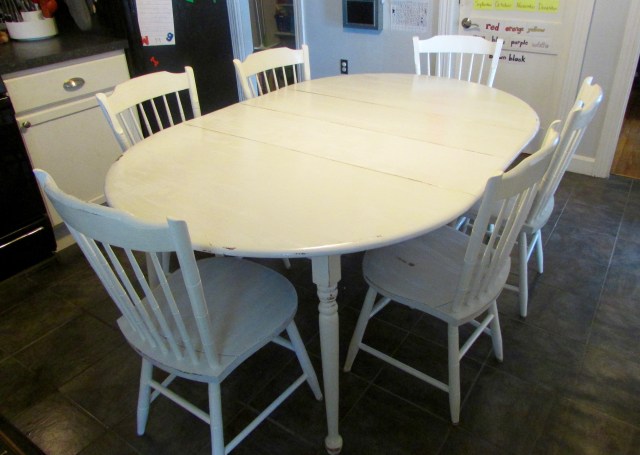 HOW IT WENT: I started with white and painted the table legs and the chair legs and spindles first. Right away, I could tell that the coverage was pretty good and I’d only need two coats. 🙂
The light gray I chose was the same that I have on my kitchen and bathroom walls. It IS pretty light, but it looked WHITE on the table outside. I was hoping that it was just the bright sunshine making it appear that way. Even though the color wasn’t as dark as I wanted, I kept going, hoping it would look better inside, like my walls and trim contrast that you can actually see in my house.


Time to distress! After a little research, I discovered that the best and easiest way to distress chalk paint would simply be with water and some elbow grease! I used a microfiber cloth and some wet sandpaper sponges (the cloth didn’t give me quite the drastic look I was going for). It was a little tough going, but I ended up being pretty happy with the results. If I had more energy at the time, I might have kept going and distressed the table more than I did, but at that point, I was ready to get the project done!

FINISHING: The problem I had when thinking about using chalk paint was that it would have a matte finish, which I figured would be difficult to keep clean. Three kids (almost four) and a white/gray table equals messiness and fingerprints! So I wanted to polyurethane the table so I would have a shiny finish that I could wipe clean and would also “seal” in the distress marks and prevent any more paint from chipping down the line. This was the disappointing part of the project. Not only was it difficult to get an even coverage that wasn’t too thick and didn’t drip, but I found that the “clear” polyurethane turned out to not be as “clear” as I thought. It dried with a yellowish tint, which made the gray of the table and chairs lose any look of actual gray, it just looked white and the actual white, ended up looking off-white. This bummed me out, but there wasn’t much I could do about it. It was probably my own fault for being a little careless with the polyurethane, but oh well.


The table itself is very old and was passed to my grandparents from their parents and from my grandparents to us. It wasn’t perfect to begin with in our house, and it’s certainly not perfect now. But Randy and I agree that any imperfections that came out of this project have added to its character. One “happy accident” was that the sun crackled some of the white paint on the chairs as they were drying and gave them a unique look that we LOVE! This probably won’t be our “forever” table, but it definitely brightens up our kitchen, looks more like it “belongs” in there now, and is serving us well for meals and homeschooling! Another fun and learning project behind me!